Who doesn't like Monkey Bread? Eric got really excited at just name. He wanted to know if actual monkeys helped make it. Nope, just our regular kitchen helper, the dog. Don't worry, once it comes out of the oven, you won't care who made it you'll just care about how quickly you can get your hands on it. Monkey Bread is a delicious bread made to be pulled apart by hand at the table, so its a really social dish. Every time we've made this for people, there is a least 15 minutes of conversation just about the bread, it really is that fun. Charisse has been making this bread for years and it's always been a hit. She's found a recipe for a sweet dessert monkey bread with a cream cheese frosting which we must try one of these days, but this time we stuck to the old standby, fluffy white bread, melted butter, and a blend of Italian herbs. It went amazingly with the Creamy Cauliflower Soup we paired it with. Surprisingly this bread is easy to make, you can sprinkle any combination of herbs and spices that you like or just have lying around. It works best (and looks the best) when you bake it in a bundt pan. If you don't happen to own a bundt pan it will work just fine in a regular bread pan. Also try and talk about using your bundt pan without giggling, or quoting that movie My Big Fat Greek Wedding. Charisse took the easy route and started the dough in the bread machine, just throw all the ingredients in and walk away. After the dough had a first rise, pull pieces off and make balls of dough which and let rise again after dredging them through the seasoning. As an alternative to the Italian style, this bread would be awesome for a summer BBQ with a mixture of Cayenne pepper and chives. Use your imagination and enjoy!
Pictures and Recipe after the break
Wednesday, March 31, 2010
Monday, March 29, 2010
Creamy Cauliflower Soup with herbed white truffle butter
Since we are a young couple on a budget, Charisse decided to try a discount grocery store that we drive by everyday but have never been in. We usually do all our shopping at farmers markets and Trader Joe's but she was feeling adventurous and hunting for a bargain and wandered into the Food Savers to see what all the fuss was about. It had been a long day at work and Food Savers was not what we expected. This huge store was a maze of aisles and packaged foods with strange finds here and there. The produce was a disappointment and the meat didn't seem all that fresh, so Charisse wandered and wandered, lost and in a daze, wary of the cow tongues and pigs feet she kept passing. When Charisse got back home Eric asked what she a bought, and the answer was " I DON'T KNOW!" We ended up with a head of red cabbage, a head of cauliflower, some bizarre peppers, condensed milk, and a ton of shallots. Luckily we had some new recipies to that we weren't going to try for a while so we got some use out of what we had. This weeks recipes are the results of trying something new, which doesn't always work out. Next week, back to Trader Joes.
First of, let's talk about soup. Charisse loves soup, especially creamy hardy soups. She'll often eat soup as an entree on a chilly day and find that it is a great healthy way to get a ton of veggies in your diet. This soup is made from a bunch of random stuff from the Food Savers adventure and it turned out really amazing. As in really really amazing. The main ingredient was the head of cauliflower and shallots, tons of fresh parsley and to make this dish feel a bit dressed up its topped it off with a white truffle butter. Truffle butter by the way, is an amazingly simple, fairly inexpensive way to really dress up something that is served with butter normally, or just needs a little something extra to put it over the top. Extremely simple to make, and it keeps, so you don't have to worry about using it all at once. We served the soup with some crusty monkey bread and a light salad (coming up later this week!). It was a simple meal, but it presented well and tasted amazing. Cheers.
Pictures and Recipe after the break
Friday, March 26, 2010
Cinnamon Buns with Cream Cheese Frosting
Over the weekend we decided that after one year of living in our home, it was time to put grass in the front yard rather than the dirt mounds and overgrown weeds that occupied this space. Saturday morning the sod was delivered, it was a huge project looming over us. Then they came, our wonderful friends and neighbors that came on out to help us out in anyway possible. Dan, Dave (and Kids), Billy and assorted significant others (Jenn, Cherelyn). We are so blessed to have such great people in our lives. So we said thank you and paid them in the only way we knew how...with food.
While the boys hauled 40 pound rolls of grass all over the yard, Charisse made sticky, gooey, delicious cinnamon buns. They were to die for! And just what the "hired help" needed. These sweet little buns disappeared in the blink of the eye. Don't expect any leftovers, especially when they are topped off with a generous dollop of cream cheese frosting! The end result: A beautiful front yard and filled tummies!
Pictures and Recipe after the break
Wednesday, March 24, 2010
Caesar Salad with Homemade Croutons
A Caesar salad is by far Eric's favorite salad. In fact on our very first date that's exactly what he ordered (Charisse had the rack of lamb and has never forgiven him for it). Eric is not a huge vegetable fan so when he finds something green he actually likes, we try to incorporate that into the rotation of meals as much as possible. Unfortunately, we also do not buy bottled salad dressings, even though a bottle of Brianna's Blush Strawberry Vinaigrette might sneak into the cart now and again (but its very rare!). Its just not cost effective buying bottled dressings, they're are expensive, and full of weird preservatives and artificial flavorings. We always try and make our own, which is cheaper by volume, has no preservatives and comes in a any flavor you want.
We've made many great dressings in the past, everything from a chili honey dressing to a balsamic Dijon but we've never done Cesar. So last week we went for it, a homemade Caesar dressing. Now a true Caesar calls for a raw egg and has no cream involved whatsoever. Funny how every Caesar on the shelf these days is mostly cream and has no egg. See what we mean about making it yourself? A real Cesar is combination of lemon, vinegar, spices, mustard and yes that raw egg (Charisse substituted a tablespoon of mayo instead since we didn't want to freak out our dinner guests). It was tart and had a bite to it and went well the the homemade croutons and Reggiano cheese.
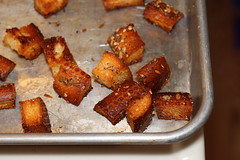
To kick up this dish I decided to make homemade croutons, instead of buying the packaged ones. Nobody should really ever need to pay for croutons, which are basically stale baked bread. Seriously this is the easiest thing ever, and if you have half a loaf of bread lying around, the cheapest. Why we ever paid $4.00+ for a bag of these things we'll never understand. Be sure to make , its a great healthy snack and people will be doing "Quality Control" long before they hit the plate. Best part, you can just toss in any herbs you have on hand for a quick creating and very little effort or cost.
Pictures and Recipe after the break
Monday, March 22, 2010
Braised Short Ribs
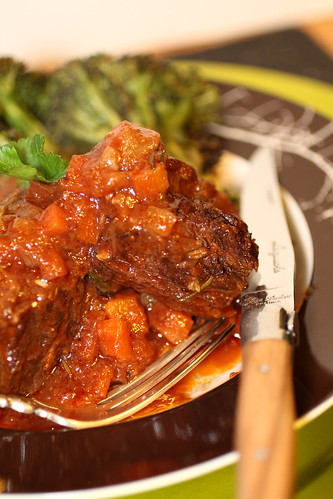
Who knew such a tough cut or meat could taste so good? Short ribs are one of the most inexpensive cuts they carry at Safeway, which is usually a sign of trouble. The weaker the cut, the more difficult it is to create a great dish. The trick with tough cuts like this is time. The more time, the better the end product in most cases. With the short ribs, about 3 1/2 hrs of searing, sauteing, de-glazing, and cooking left the house smelling fantastic, the kind of cooking that leaves an aroma that fills the block leaving all the neighbors jealous and hungry. The aroma was good, but the taste of the sweet meat falling off the bone was even better. We think this dish got more moans and groans then the last fillets we made. This was even more surprising considering that short ribs are usually very tough unless cooked correctly. This dish is really affordable, but don't tell your guests because it tastes like you spent a fortune.
Charisse first tried short ribs at a wonderful little bistro in Los Gatos, called Nick's on Main and loved it. We then began talking about trying it ourselves, and a week or so later, we got our issue of Fine Cooking and there was an entire section dedicated to creating your own braised short rib recipe. How convenient! So on a cold Saturday afternoon we began the short rib journey. All the steps are extremely important so don't rush and don't skimp on ingredients! The following recipe is Charisse's version, but we are going to be trying different combinations of spices and herbs to see what works best. Don't worry, we'll keep you all updated on all our attempts, even when we end up ordering pizza!
Pictures and Recipe after the break
Friday, March 19, 2010
Baked Chocolate Custard
Since calories don’t count on Fridays, we decided to go with a dessert and do a Baked Chocolate Custard. When planing for this meal, we decided to have our good friends over, and discovered that one of these wonderful guests is quite picky when it comes to her desserts! Names will not be used...you know who you are Jenn. She will not eat anything white, saucy, or any type of cooked fruit, but she will eat chocolate. Which worked out perfectly since we were making Chocolate Custard. A very simple recipe, most of the ingredients you will find already in your pantry and you'll be amazed at the results. A few large, white ramekins and some powdered sugar really makes this a presentable dessert without any extra work.
Pictures and Recipe after the break
Wednesday, March 17, 2010
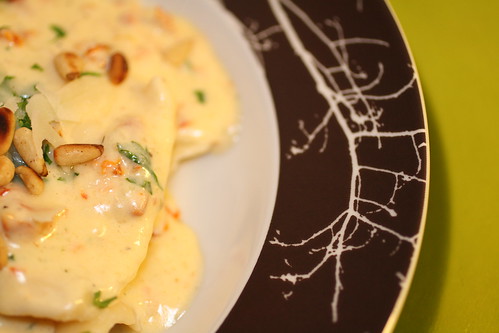
Brie and Roasted Garlic Ravioli
Our favorite food is pasta. Honestly, if we were stuck on a desert island with only one food for the rest of our lives, we would choose pasta!! Egg pasta, semolina pasta, spinach pasta, tomato pasta, pasta with marinara sauce, pasta with pesto sauce, pasta with creamy Alfredo sauce, pasta with seafood, pasta with chicken, pasta with veggies, we love pasta. This is an intense life long love affair with pasta. We recently bought the Kitchenaid Pasta Roller attachment and decided put it to work. Pasta stuffed with yummy stuff...otherwise known as ravioli.
Making the dough was a cinch. Here's a tip from the Petruno household on amazingly fresh pasta...Play with your dough people! No really, I know usually in bread making the less you handle your dough the better but with pasta dough...play, smash, roll and kneed. You'll notice a difference trust us. This time we let the Kitchenaid do most of the work but for the last 10 minutes or so Charisse hand kneaded the daylights out of the thing. The dough should be leathery and pliable but not sticky or crumbling apart. While the dough rested it was time to put together the filling. Roasted garlic and brie cheese, a combination that combines two of the worlds greatest things. Topped with a sun-dried tomato sauce and toasted pine nuts, there wasn't enough to go around.
Chef's Note: I could eat these everyday! Although next time if I were to change on thing I would add some roasted chicken or spinach to the filling for more texture and color. The texture of the brie was really similar to the texture of the pasta.
Pictures and Recipe after the break
Monday, March 15, 2010
Blackened Scallops Over Light Pasta
It was a dark and stormy Thursday night and our usual chef had had a long day at work, so Eric went for the combo: Head Chef and Photographer. Never doing that again. How anyone in their right mind thinks it’s a good idea to try to sauté mushrooms and onions, prepare a rub, defrost scallops dredge said scallops and operate a camera while making sure the pasta does not get overdone all at the same time is beyond me. It came together right at the end, somehow or another, but not an experience anyone wants again anytime soon. It’s a good thing the dish was worth it. Very much worth it. The scallops were blackened in a pepper mixture and the pasta was drizzled in extra virgin olive oil and butter. Even with all the butter, this was one of the healthiest meals anyone’s ever felt the need to brag about. This is a super easy meal, as long as your not trying to do everything all at once and take pictures.
Chef’s note: the recipe has a lot of pepper in it. I mean a lot a lot. If I did it again, I would probably cut down the Cayenne Pepper a pinch. This was also a total leftovers meal, so a lot of the discrepancies between the original and mine have to do with item availability. That and the fact that I hate the texture of tomatoes. So here’s the Foodies@Home rendition of Blackened Scallops Over Pasta.
Pictures and Recipe after the break
Friday, March 12, 2010
Golden Belgium Waffles with Dutch Honey Syrup
What is the best part of waking up early on the weekends? Waffles. Hot, buttery waffles with all those nooks and crannies for the syrup and butter to pool in.
What an amazing way to start a Sunday, it’s become a weekend tradition in our house. When we received a waffle press as a wedding gift we never thought we wanted one. Oh the things we never knew we wanted. Now we look forward to a hot breakfast every Sunday morning. Usually we are simple people with our waffles, a small pat of butter and a bit of maple syrup, Last Sunday was different. Last Sunday we ran out of syrup. So Charisse decided to be creative, and turns out that was a really good thing. To top off our perfectly golden waffles she made a Dutch Honey Syrup and all was right with the world. We may never buy bottled syrup again. Surprisingly Dutch Honey Syrup has no honey involved, it is a mix of sugar on top of sugar on top of sugar, isn't that great?
It is a bit sweet so you don't need too much, unless you want to be bouncing off the walls! After breakfast we saved the leftovers in the fridge for another day and it was still perfect. If you’re cooking for two split the recipe in half, unless you want lots of leftovers! Easy to make and definitely worth it! Mmm... is it Sunday yet?!
Pictures and Recipe after the break
Wednesday, March 10, 2010
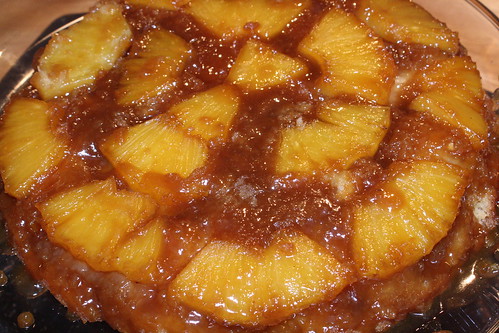
Pineapple Upside Down Cake with Dark Rum Sauce
This recipe is a tribute to my Grandma Martha, who left this world 3 years ago. I was very close to my grandma and it only seems fitting to dedicate this cake to her, considering we are living in her home and cooking in her kitchen. When I was little, Sundays were the days I spent with her, playing in the yard, watching movies and learning how to make things like meatloaf, pot roast, and mashed potatoes. One of her favorite desserts was the pineapple upside down cake, I remember how sweet and sticky the topping was and how the maraschino cherries dyed the pineapple a pinkish color. She used the classic recipe from Betty Crocker which included cardamon and was topped off with a sprinkling of dark rum. I switched it up a bit to make it more contemporary and to suit my taste buds since I hate those candy red maraschino cherries anyway.
This cake has no cardamon, no cherries, and instead of a sprinkling of rum, I paired it with a good helping of dark rum sauce! Lastly I used fresh pineapple juice from the same pineapple rather than the canned juice the recipe calls for. YUMMY!! The result was a moist and caramelly, sweet cake with large chucks of tender pineapple. Delicious and worth trying!
I cooked the whole cake (except the rum sauce!) in Grandma Martha's cast iron skillet, which is the pan I highly recommend. The skillet will let you prepare the brown sugar right where its needed, instead of in a separate pan. You get more caramelized sugar on top of your cake because the same pan can go straight from the stovetop to the oven!
Pictures and Recipe after the break
Monday, March 8, 2010
Potato Leek Gratin
Readers beware... you are about to hear about the ooey-est, gooey-est, cheesy-est potato dish of all times and don't say we didn't warn you because your going to be addicted! We first made this potato leek gratin for Christmas Eve dinner and we haven't stopped talking about it since. With summer fast approaching we wanted to make this hot comfort dish one last time, and we think the people who sunk their teeth into it were more than grateful. Sure this gratin's got it all...potatoes, cheese, cream...but the real key to the flavor and smell of the bubbly goodness are the leeks! Who knew how awesome leeks were?! We've seen them in some obscure part of the produce section at the grocery store in passing, but have never thought about what they might be like. Truth is...they're amazing! Crispy with a mild onion flavor, they give a great boost to the regular gratins of the past! Of course this is not a dish one would eat on a daily basis, but it is worth making some cold evening when the ultimate comfort is just what the doctor ordered.
Pictures and Recipe after the break
Friday, March 5, 2010
Our Kitchen
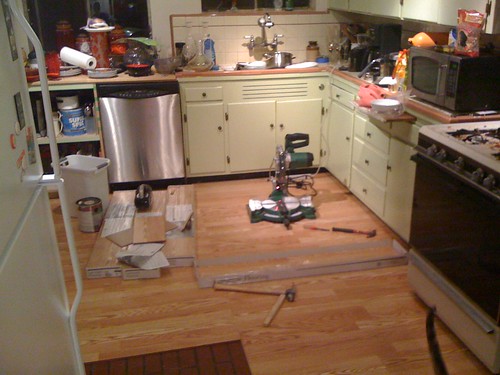
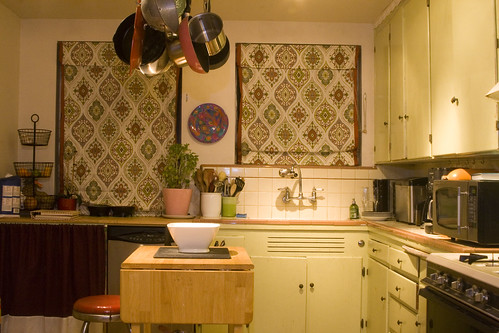
In our last post we talked about some of the great kitchen tools we used, today we’ve got a quick tour of our kitchen so far. I say so far, as the kitchen is in need of a major update and overhaul. As an aside, here’s a little background on the kitchen and house we have now. The house belonged to Charisse’s grandfather, Erv. Her dad Patrick grew up there before moving to Willow Glen a few miles away. Erv lived there for 57 years before moving into an in law unit Charisse’s parents built for him. We moved into the house and started renovating it, bit by bit. Its been about a year and we’ve finally gotten things somewhat settled. Now that doesn’t mean the house is done, but it is a long way from where it was when we moved in. Far enough along that were willing to post some pictures of it. Here's the Kitchen as it was when we moved in
This is where we have it now:
Some of the features we’ve focused on are the floors, pot rack dishwasher and refrigerator corner. When we moved in, a pot bellied stove had displaced the refrigerator (left), so that was project 1. No chef in their own house should have to get by without a dishwasher, though its too bad those weren’t standard in 1950, so I built that in, and a friend of ours helped build the cabinet. Lastly We got ourselves some new flooring for our first anniversary (aren’t we romantic?).
After all that, we’ve hit a point where we’re basically happy with the way things are, a few more coats of paint and finishing touches (like a new stove) and we’ll be all set. Speaking of the stove, as you can see from this picture its at least a million years old. Butt that’s the benefit of cooking with gas, you don’t need to worry about any faulty coils or burnt out elements, as old as this stove is, it works just fine. One day we’ll get a new one, but until then, this will do.
And that’s it, whenever you see something amazing here, you know where it was made!
Wednesday, March 3, 2010
Our Favorite Things
Charisse and I talked for a while about what to do this week since we won't be cooking until the weekend. We ended up deciding on doing an introduction and tour of our kitchen along with some of the tools we use on a day to day basis. So here's "about us" and a run down of some of our favorite kitchen tools! Don't forget to visit The Written Geek for more about the photography side of the blog!
Charisse and I are both native to San Jose, California having grown up less than 10 miles apart. We met online on Match.com in 2006 and even though we had never met, we've been in the same places at the same times over the past 10 years. We even went to rival high schools. Charisse and I had both been interested in cooking and grilling, but it was not until after we moved into a tiny San Francisco studio and were married in 2008 that we really began to take cooking seriously. When we moved back to San Jose in 2009, cooking became an all around passion for both of us. We've reached a point where cooking has become art, and we're ready to share it with the world. Or at least the internet.
When we were brainstorming ideas for this post, we decided to showcase some of our kitchen essentials:
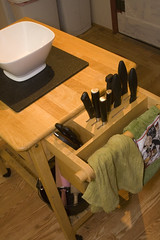
Now first and foremost, good tools does not a good chef make. In my experience cooking is 65% experience 20% ingredients and the rest is a good recipe. When your shopping for tools though, having good tools just makes life a little easier. This shot here is our selection of Shun Classic knives and wooden spoons, the tools that get used in every single meal. Not everyone needs a set knives that cost of $200 per knife, good quality knives can be found in just about any price range. Wooden spoons are cheap and having a large selection of different shapes and sizes will make putting a large meal together easier when your not constantly washing the same spoon over and over or having different ingredients mixing together in ways you don't intend.
A few other important elements in a good kitchen is the stove, oven and a few pots and pans. We've started switching our pans to a collection of cast iron and All-Clad Copper Core. Combined with a gas stove, these are excellent pots for just about any dish. When it comes to cast iron, you could go with the enameled Le Creuset pieces costing upwards of $100.00 or more, or you can go down to the local camping supply store and buy a plain black pan for 15 bucks. Either will work, we use both depending on availability. Maybe we'll do a blog later on just focusing on cast iron cooking. Either way, here's a look at our 8" All-Clad fry pan on the stove.
Monday, March 1, 2010
Budget cooking, phenomenal results!
Welcome to Foodies @ Home, a blog brought to you by me Eric AKA The Written Geek and my wife Charisse. As Foodies on a budget, we've spent a lot of time and effort finding ways to come up with amazing meals for not much money, which goes along way to explain why all of our friends like to make "reservations" at Ristorante de Petruno. We have so much fun cooking (and our friends have so much fun eating) we've decided to chronicle our foodie attempts here in a blog. Look for lots of pictures, tips, recipes and reviews of things we have or buy as well as ideas on how to shop local or where to look when you need something... interesting. I'll also be documenting my experiences learning to photograph food on my photoblog Thewrittengeek.
Subscribe to:
Posts (Atom)